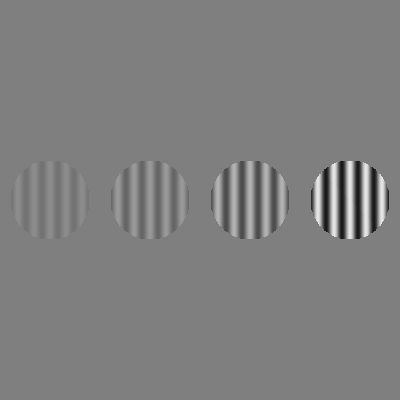
Drawing—gratings
Objectives
- Be able to generate and display grating stimuli.
- Understand and manipulate key grating parameters (phase, spatial frequency, orientation, contrast).
- Be aware of different ways to “mask” stimuli such as gratings.
Gratings are a very important type of stimulus in vision research.
Fundamentally, they are created from oscillations in luminance over space (typically sinusoidal).
In psychopy, we can create gratings using GratingStim.
Let’s take a look at the grating that is created when we use mostly default parameters:
import psychopy.visual
import psychopy.event

win = psychopy.visual.Window(
    size=[400, 400],
    units="pix",
    fullscr=False
)

grating = psychopy.visual.GratingStim(
    win=win,
    units="pix",
    size=[150, 150]
)

grating.draw()

win.flip()

psychopy.event.waitKeys()

win.close()
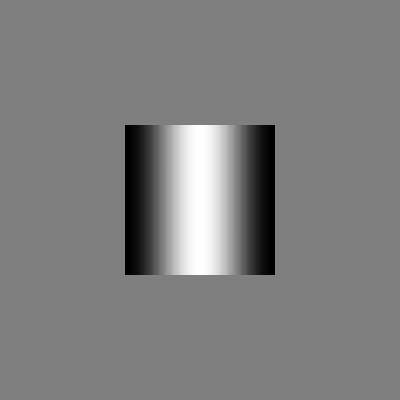
As you can see, we have created a square stimulus where the luminance intensity goes from black at the left edge, white in the middle, and back to black at the right edge. Overall, this change in luminance intensity follows a sine wave profile.
Now, we will go through some of the key arguments that are used to change the properties of grating stimuli.
Phase
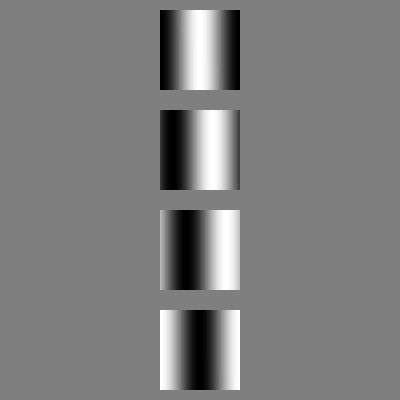
This parameter controls the relative positioning of the light and dark regions of the grating. In psychopy, this parameter is specified as a value between 0 and 1. For example, the code below shows four gratings that change in phase between 0 (top) and 0.5 (bottom). Notice how the position of the “light bar” moves horizontally with the change in phase; when the phase is 0.5, the light and dark regions have swapped compared with when the phase was 0.
import psychopy.visual
import psychopy.event

win = psychopy.visual.Window(
    size=[400, 400],
    units="pix",
    fullscr=False
)

grating = psychopy.visual.GratingStim(
    win=win,
    units="pix",
    size=[80, 80]
)

grating_vpos = [150, 50, -50, -150]
grating_phase = [0.0, 0.16, 0.33, 0.5]

for i_phase in range(4):

    grating.phase = grating_phase[i_phase]

    grating.pos = [0, grating_vpos[i_phase]]

    grating.draw()

win.flip()

psychopy.event.waitKeys()

win.close()
Spatial frequency
This parameter specifies the number of cycles (the number of oscillations) over some unit of distance.
In psychopy (when the units are pix, as we typically use), this is in cycles per pixel.
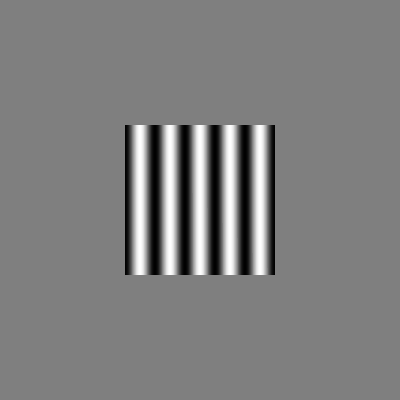
For example, if we have a grating that is 150 pixels in size and we want it to have 5 cycles, the spatial frequency would be 5 / 150 = 0.033:
import psychopy.visual
import psychopy.event

win = psychopy.visual.Window(
    size=[400, 400],
    units="pix",
    fullscr=False
)

grating = psychopy.visual.GratingStim(
    win=win,
    units="pix",
    size=[150, 150]
)

grating.sf = 5.0 / 150.0

grating.draw()

win.flip()

psychopy.event.waitKeys()

win.close()
Orientation
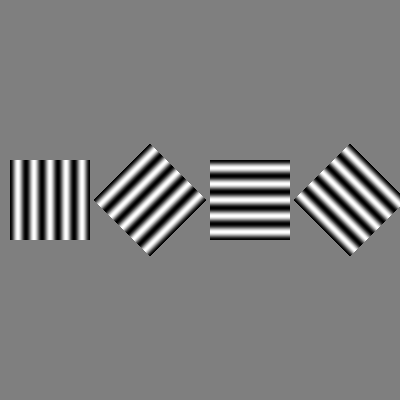
This parameter controls the ‘tilt’ of the grating. In psychopy, we specify this in units of degrees, where 0 is vertical and increasing angles are increasing clockwise. For example:
import psychopy.visual
import psychopy.event

win = psychopy.visual.Window(
    size=[400, 400],
    units="pix",
    fullscr=False
)

grating = psychopy.visual.GratingStim(
    win=win,
    units="pix",
    size=[80, 80]
)

grating.sf = 5.0 / 80.0

orientations = [0.0, 45.0, 90.0, 135.0]
grating_hpos = [-150, -50, 50, 150]

for i_grating in range(4):

    grating.ori = orientations[i_grating]
    grating.pos = [grating_hpos[i_grating], 0]

    grating.draw()

win.flip()

psychopy.event.waitKeys()

win.close()
Masking
In the previous example, changing the orientation of the grating also changed the shape of its region.
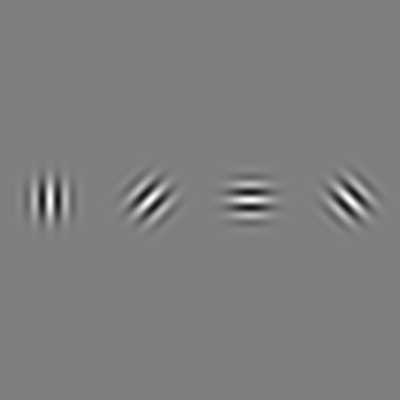
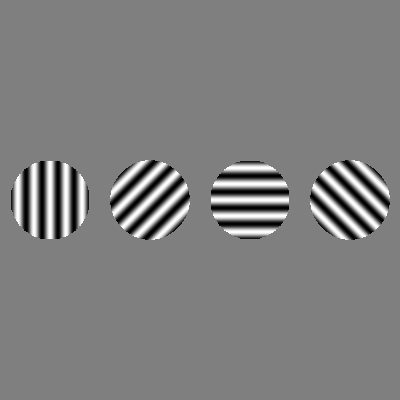
For this reason, amongst others, we typically present the grating with a “mask”, which varies the visibility of the grating within its region.
A typical mask is a Gaussian, which we can set by using mask = "gauss", as below:
import psychopy.visual
import psychopy.event

win = psychopy.visual.Window(
    size=[400, 400],
    units="pix",
    fullscr=False
)

grating = psychopy.visual.GratingStim(
    win=win,
    units="pix",
    size=[80, 80]
)

grating.sf = 5.0 / 80.0

grating.mask = "gauss"

orientations = [0.0, 45.0, 90.0, 135.0]
grating_hpos = [-150, -50, 50, 150]

for i_grating in range(4):

    grating.ori = orientations[i_grating]
    grating.pos = [grating_hpos[i_grating], 0]

    grating.draw()

win.flip()

psychopy.event.waitKeys()

win.close()
Another common mask is a circle, which we can set by using mask = "circle", as below:
import psychopy.visual
import psychopy.event

win = psychopy.visual.Window(
    size=[400, 400],
    units="pix",
    fullscr=False
)

grating = psychopy.visual.GratingStim(
    win=win,
    units="pix",
    size=[80, 80]
)

grating.sf = 5.0 / 80.0

grating.mask = "circle"

orientations = [0.0, 45.0, 90.0, 135.0]
grating_hpos = [-150, -50, 50, 150]

for i_grating in range(4):

    grating.ori = orientations[i_grating]
    grating.pos = [grating_hpos[i_grating], 0]

    grating.draw()

win.flip()

psychopy.event.waitKeys()

win.close()
Contrast
The final parameter we will consider is the grating contrast. This value ranges between 0 and 1, and determines the magnitude of the difference between the intensity of the highest and lowest luminance areas in the grating (formally, it is the difference between the maximum and minimum luminances divided by the sum of the maximum and minimum luminances). When the contrast is 0, the grating is invisible, whereas when it is 1 it is at full contrast.
In the example below, we change the contrast of the gratings from low (0.1) to high (0.8):
import psychopy.visual
import psychopy.event

win = psychopy.visual.Window(
    size=[400, 400],
    units="pix",
    fullscr=False
)

grating = psychopy.visual.GratingStim(
    win=win,
    units="pix",
    size=[80, 80]
)

grating.sf = 5.0 / 80.0

grating.mask = "circle"

contrasts = [0.1, 0.2, 0.4, 0.8]
grating_hpos = [-150, -50, 50, 150]

for i_grating in range(4):

    grating.contrast = contrasts[i_grating]
    grating.pos = [grating_hpos[i_grating], 0]

    grating.draw()

win.flip()

psychopy.event.waitKeys()

win.close()
